Categories
Laravel

CRUD Operations In Laravel 8

This tutorial is created to illustrate the basic CRUD (Create , Read, Update, Delete) operation using SQL with Laravel 8. Laravel is one of the fastest-growing frameworks for PHP. Laravel 8 continues the improvements made in the previous stable release. Refer release notes to see the changes made in Laravel 8.

In this tutorial, You’ll learn to create the basic CRUD operations in Laravel. Follow the step-by-step guide to implement CRUD in Laravel 8.

What is CRUD?

When we are creating any dynamic web applications, it deals with some database operations such as Create, Read, Update, and Delete which are the four basic functions that we implement with the model. Hence, Software Engineers or Computer scientists often refer to these functions with the acronym CRUD .

  1. Install Laravel

First, let install Laravel using the following command (Make sure you have installed composer in your PC). Click on Install Composer If you haven’t installed Composer on your PC.

composer create-project --prefer-dist laravel/laravel stock_management
  1. Configure the Database

You need to create the database at MYSQL and then we need to connect that database to the Laravel project (You can also use phpmyadmin to create the database). Open the .env file inside Laravel project and add the database credentials as below.

.env

DB_CONNECTION=mysql
DB_HOST=127.0.0.1
DB_PORT=3306
DB_DATABASE='Your DB Name'
DB_USERNAME='Your DB UserName'
DB_PASSWORD='Your DB Password'
Code language: JavaScript (javascript)
  1. Create the Stock Model and Migration

Next we are going to create the model using the following artisan command which will create the Model and the corresponding migration file.

php artisan make:model Stock -m
Code language: CSS (css)

Open app/Models/Stock.php file and define the modal values in the $fillable prop.

app\Models\Stock.php

<?php

namespace App\Models;

use Illuminate\Database\Eloquent\Factories\HasFactory;
use Illuminate\Database\Eloquent\Model;

class Stock extends Model
{
    use HasFactory;
    public $fillable = [
        'product_name',
        'product_desc',
        'product_qty'
    ];
}

Code language: HTML, XML (xml)

The migration will be created under β€œdatabase/migrationsβ€œ. Edit the file with the code below to create Stock Table.

database/migrations/timestamp_create_stocks_table.php

<?php

use Illuminate\Database\Migrations\Migration;
use Illuminate\Database\Schema\Blueprint;
use Illuminate\Support\Facades\Schema;

class CreateStocksTable extends Migration
{
    /**
     * Run the migrations.
     *
     * @return void
     */
    public function up()
    {
        Schema::create('stocks', function (Blueprint $table) {
            $table->increments('id');
            $table->string('product_name');
            $table->text('product_desc');
            $table->integer('product_qty');
            $table->timestamps();
        });
    }

    /**
     * Reverse the migrations.
     *
     * @return void
     */
    public function down()
    {
        Schema::dropIfExists('stocks');
    }
}
Code language: HTML, XML (xml)

Type the following command to run the migration.

php artisan migrate
  1. Create Seeder

Next we are going to add some dummy data to the stock table using laravel Seeder using the following artisan command.

php artisan make:seeder StockTableSeeder
Code language: CSS (css)

All seeders generated will be placed in the database/seeders directory.

database\seeders\StockTableSeeder.php

<?php

namespace Database\Seeders;

use App\Models\Stock;
use Illuminate\Database\Seeder;

class StockTableSeeder extends Seeder
{
    /**
     * Run the database seeds.
     *
     * @return void
     */
    public function run()
    {
        Stock::create([
            'product_name' => 'Twinty Pencil',
            'product_desc' => 'HB 5 Drawing Pencil',
            'product_qty' => 100,
        ]);
    }
}
Code language: HTML, XML (xml)

So, we have added the columns product_nameproduct_descproduct_qty values that will be stored in the database. Run the following command to execute StockTableSeeder :

php artisan db:seed --class=StockTableSeeder
Code language: JavaScript (javascript)
  1. Create Route and Resource Controller

Now, It’s time to create the logic for CRUD operations. We will use the Resource Controller to define the operations under the pre-defined methods within the Resource Controller. Run the following Artisan command to create the Stock resource controller.

php artisan make:controller StockController --resource
Code language: CSS (css)

In this step, Go to routes->web.php file, add the following line of code to direct the routes to Stock Controller.

<?php

use App\Http\Controllers\StockController;
use Illuminate\Support\Facades\Route;


// Redirects to the Stock Resource Controller
Route::get('/', function () {
    return redirect('/stocks');
});

Route::resource('stocks', StockController::class);
Code language: HTML, XML (xml)

Add the following lines of codes in StockController to manipulate the basic CRUD operations.

app\Http\Controllers\StockController.php

<?php

namespace App\Http\Controllers;

use App\Models\Stock;
use Illuminate\Http\Request;

class StockController extends Controller
{
    public function index()
    {
        $stocks = Stock::latest()->paginate(5);
        return view('stocks.index',compact('stocks'))->with('i', (request()->input('page', 1) - 1) * 5);
    }

    public function create()
    {
        return view('stocks.create');
    }

    public function store(Request $request)
    {
        $request->validate([
            'product_name' => 'required',
            'product_desc' => 'required',
            'product_qty' => 'required',
        ]);

        Stock::create($request->all());
        return redirect()->route('stocks.index')->with('success','Created Successfully.');
    }

    public function show(Stock $stock)
    {
        return view('stocks.show',compact('stock'));
    }


    public function edit(Stock $stock)
    {
        return view('stocks.edit',compact('stock'));
    }

    public function update(Request $request, Stock $stock)
    {
        $request->validate([
            'product_name' => 'required',
            'product_desc' => 'required',
            'product_qty' => 'required',
        ]);

        $stock->update($request->all());
        return redirect()->route('stocks.index')->with('success','Updated Successfully.');
    }


    public function destroy(Stock $stock)
    {
        $stock->delete();
        return redirect()->route('stocks.index')->with('success','Student deleted successfully.');
    }
}
Code language: HTML, XML (xml)
  1. Create the Views

Finally, create a folder Inside the resources\views directory as stocks within that folder, create the following five files.

  1. layout.blade.php
  2. index.blade.php
  3. create.blade.php
  4. edit.blade.php
  5. show.blade.php

layout.blade.php

<!DOCTYPE html>
<html>
<head>
    <title>Laravel 8 CRUD Application - bishrulhaq.com</title>
    <link rel="stylesheet" href="https://maxcdn.bootstrapcdn.com/bootstrap/4.0.0/css/bootstrap.min.css" integrity="sha384-Gn5384xqQ1aoWXA+058RXPxPg6fy4IWvTNh0E263XmFcJlSAwiGgFAW/dAiS6JXm" crossorigin="anonymous">
</head>
<body>

<div class="container">
    <div class="card" style="margin-top: 20px;">
        <div class="card-body">
        @yield('content')
        </div>
    </div>
</div>

</body>
</html>
Code language: HTML, XML (xml)

index.blade.php

@extends('stocks.layout')

@section('content')

    <div class="row">
        <div class="col-lg-12">
            <h2 class="text-center">Simple Stock Management Application | BH</h2>
        </div>
        <div class="col-lg-12 text-center" style="margin-top:10px;margin-bottom: 10px;">
            <a class="btn btn-success " href="{{ route('stocks.create') }}"> Add Stock</a>
        </div>
    </div>

    @if ($message = Session::get('success'))
        <div class="alert alert-success">
            {{ $message }}
        </div>
    @endif

    @if(sizeof($stocks) > 0)
        <table class="table table-bordered">
            <tr>
                <th>No</th>
                <th>Product Name</th>
                <th>Product Description</th>
                <th>Qty.</th>
                <th width="280px">More</th>
            </tr>
            @foreach ($stocks as $stock)
                <tr>
                    <td>{{ ++$i }}</td>
                    <td>{{ $stock->product_name }}</td>
                    <td>{{ $stock->product_desc }}</td>
                    <td>{{ $stock->product_qty }}</td>
                    <td>
                        <form action="{{ route('stocks.destroy',$stock->id) }}" method="POST">
                            <a class="btn btn-info" href="{{ route('stocks.show',$stock->id) }}">Show</a>
                            <a class="btn btn-primary" href="{{ route('stocks.edit',$stock->id) }}">Edit</a>
                            @csrf
                            @method('DELETE')
                            <button type="submit" class="btn btn-danger">Delete</button>
                        </form>
                    </td>
                </tr>
            @endforeach
        </table>
    @else
        <div class="alert alert-alert">Start Adding to the Database.</div>
    @endif

    {!! $stocks->links() !!}

@endsection
Code language: HTML, XML (xml)

create.blade.php

@extends('stocks.layout')

@section('content')

<div class="row">
    <div class="col-lg-12">
        <h2 class="text-center">Add Stock</h2>
    </div>
    <div class="col-lg-12 text-center" style="margin-top:10px;margin-bottom: 10px;">
        <a class="btn btn-primary" href="{{ route('stocks.index') }}"> Back</a>
    </div>
</div>

@if ($errors->any())
<div class="alert alert-danger">
    <strong>Oops!</strong> There were some problems with your input.<br><br>
    <ul>
        @foreach ($errors->all() as $error)
        <li>{{ $error }}</li>
        @endforeach
    </ul>
</div>
@endif

<form action="{{ route('stocks.store') }}" method="POST">
    @csrf

    <div class="row">
        <div class="col-xs-12 col-sm-12 col-md-12">
            <div class="form-group">
                <strong>Product Name:</strong>
                <input type="text" name="product_name" class="form-control" placeholder="Product Name">
            </div>
        </div>
        <div class="col-xs-12 col-sm-12 col-md-12">
            <div class="form-group">
                <strong>Product Description:</strong>
                <textarea class="form-control" style="height:150px" name="product_desc" placeholder="Product Description"></textarea>
            </div>
        </div>
        <div class="col-xs-12 col-sm-12 col-md-12">
            <div class="form-group">
                <strong>Qty:</strong>
                <input type="number" class="form-control" name="product_qty" placeholder="Quantity">
            </div>
        </div>
        <div class="col-xs-12 col-sm-12 col-md-12 text-center">
            <button type="submit" class="btn btn-primary">Submit</button>
        </div>
    </div>

</form>
@endsection
Code language: HTML, XML (xml)

edit.blade.php

@extends('stocks.layout')

@section('content')

    <div class="row">
        <div class="col-lg-12">
            <h2 class="text-center">Edit Stock</h2>
        </div>
        <div class="col-lg-12 text-center" style="margin-top:10px;margin-bottom: 10px;">
            <a class="btn btn-primary" href="{{ route('stocks.index') }}"> Back</a>
        </div>
    </div>

    @if ($errors->any())
        <div class="alert alert-danger">
            <strong>Whoops!</strong> There were some problems with your input.<br><br>
            <ul>
                @foreach ($errors->all() as $error)
                    <li>{{ $error }}</li>
                @endforeach
            </ul>
        </div>
    @endif

    <form action="{{ route('stocks.update',$stock->id) }}" method="POST">
        @csrf
        @method('PUT')

        <div class="row">
            <div class="col-xs-12 col-sm-12 col-md-12">
                <div class="form-group">
                    <strong>Product Name:</strong>
                    <input type="text" name="product_name" value="{{ $stock->product_name }}" class="form-control" placeholder="Product Name">
                </div>
            </div>
            <div class="col-xs-12 col-sm-12 col-md-12">
                <div class="form-group">
                    <strong>Product Description:</strong>
                    <textarea class="form-control" name="product_desc" style="height:150px"  placeholder="Product Description">{{ $stock->product_desc }}</textarea>
                </div>
            </div>
            <div class="col-xs-12 col-sm-12 col-md-12">
                <div class="form-group">
                    <strong>Qty:</strong>
                    <input type="number" name="product_qty" class="form-control" style="height:150px" value="{{ $stock->product_qty }}"  placeholder="Quantity">
                </div>
            </div>
            <div class="col-xs-12 col-sm-12 col-md-12 text-center">
                <button type="submit" class="btn btn-primary">Submit</button>
            </div>
        </div>

    </form>
@endsection
Code language: HTML, XML (xml)

show.blade.php

@extends('stocks.layout')

@section('content')

    <div class="row">
        <div class="col-lg-12">
            <h2 class="text-center">Show Stock</h2>
        </div>
        <div class="col-lg-12 text-center" style="margin-top:10px;margin-bottom: 10px;">
            <a class="btn btn-primary" href="{{ route('stocks.index') }}"> Back</a>
        </div>
    </div>

    <div class="row">
        <div class="col-xs-12 col-sm-12 col-md-12">
            <div class="form-group">
                <strong>Product Name : </strong>
                {{ $stock->product_name }}
            </div>
        </div>
        <div class="col-xs-12 col-sm-12 col-md-12">
            <div class="form-group">
                <strong>Product Description : </strong>
                {{ $stock->product_desc }}
            </div>
        </div>
        <div class="col-xs-12 col-sm-12 col-md-12">
            <div class="form-group">
                <strong>Quantity : </strong>
                {{ $stock->product_qty }}
            </div>
        </div>
    </div>
@endsection
Code language: HTML, XML (xml)

Type the following command in your terminal to run the application.

php artisan serve

Hope this tutorial helps you! Feel free to drop your opinion at the comment section.

Categories
PHP Programming

Installing PHP on Windows

What is PHP?

PHP is known to be one of the most commonly used server-side programming language on the web. It provides an easy to master with a simple learning curve. It has close ties with the MySQL database, and various libraries to cut your development time.

Two Ways to install PHP locally

There are several ways that we could install PHP locally. Here i have added two of the most common ways to install PHP as shown below.

  1. Installing a Web Server (XAMPP, WAMP etc)
  2. Implementing via PHP Installer
Installing a Web Server

There are many all-in-one packages are available for Windows and other OS’s which comes with Apache, PHP, MySQL and other applications as a single file installer, e.g. XAMPP, WampServer, MAMP etc. There is no any issue in going with these packages, however manually installing Apache and PHP will help you to have more control and access to its configuration options.

XAMPP :
https://www.apachefriends.org/index.html

WampServer :
https://www.wampserver.com/en/

MAMP :
https://www.mamp.info/en/windows/

Implementing via PHP Installer

It provides several benefits for backing up, reinstalling, or moving the web server can be executed easily in a short amount of time and it provides more control over PHP and Apache configuration. In the Manual Installation, you need to configure several steps in order to install PHP successfully.

Step 1 : Download the PHP package & Extract THE FILES

Get the PHP version 8.0 or later (x64 Thread Safe) package zip file via navigating under the windows downloads URL mentioned in the link below.

https://www.php.net/downloads.php.

After, downloading the zip successfully to your PC, create a folder as “PHP” in any drive and extract the PHP package files into it.

STEP 2 : CONFIGURE PHP

Initially php.ini file doesn’t exist inside the php package files. so copy {drive_name}:\php\php.ini-development and rename it as {drive_name}:\php\php.ini whereas the default configuration provides a development setup.

To uncomment a setting inside the php.ini file you need to remove a leading semicolon (;). Uncomment the following lines to enable the required extensions whereas the following extensions are mostly required by many PHP frameworks and for other operations.

extension=curl
extension=gd
extension=mbstring
extension=pdo_mysql
Step 3 : Add PHP to The environment variable

To access PHP globally at your PC add the PHP package path by following the steps below.

  • Step 1: Click the Windows Start button and type β€œenvironment”.
  • Step 2: Click Edit the system environment variables. Select the Advanced tab, and click the Environment Variables button.
  • Step 3: Scroll down the System variables list and click Path followed by the Edit button.
  • Step 4 : Click New and add {drive_name}:\php:

NOTE: You are not required to reboot the PC, but you may need to close and restart any cmd terminals if you have opened before.

STEP 4 : Test a PHP file

Create a new file named index.php and add the following lines of codes and save it.

<?php
  phpinfo();
?>
Code language: HTML, XML (xml)

Run the PHP file by entering the following command in CMD where you have created the index.php file.

php index.php
Code language: CSS (css)
Categories
Tutorials

Installing Nginx, PHP, MySQL and PHPMyAdmin on Ubuntu 18.04

This tutorial is created to set up Nginx and PHPMyAdmin along with PHP 7.4 on ubuntu 18.04 with simple and easy steps.

Update via the command line

Before beginning the whole set up process make sure you’re at the command line and type the following commands.

sudo apt update
 Install NGINX

Now let’s install NGINX and check whether it’s running or not.

sudo apt install nginx -y
systemctl status nginx

The β€œ-y” in the end automatically enters β€œyes” when the command β€œsudo apt install nginx -y” ask for your confirmation before installing. After the installation. Check your Server by navigating into your IP ADDRESS as shown below.

http://IP_SERVER
Code language: JavaScript (javascript)
Installing PHP and MariaDB

Install PHP 7.4 and all the important plugins and check the server status.

sudo apt install software-properties-common -y
sudo add-apt-repository ppa:ondrej/php
sudo apt install php7.4-fpm php7.4-common php7.4-dom php7.4-intl php7.4-mysql php7.4-xml php7.4-xmlrpc php7.4-curl php7.4-gd php7.4-imagick php7.4-cli php7.4-dev php7.4-imap php7.4-mbstring php7.4-soap php7.4-zip php7.4-bcmath -y

Run the following command to check the status of php 7.4

systemctl status php7.4-fpm
Code language: CSS (css)

Import MariaDB gpg key by running the command below to add it to your system.

Visit MariaDB website to obtain the gpg key

sudo apt-key adv --fetch-keys 'https://mariadb.org/mariadb_release_signing_key.asc'
Code language: JavaScript (javascript)

Once the key is imported add the apt repository URL

sudo add-apt-repository 'deb [arch=amd64,arm64,ppc64el] http://mirror.nodesdirect.com/mariadb/repo/10.4/ubuntu bionic main'
Code language: JavaScript (javascript)

After that Install the MariaDB Server on ubuntu by following commands.

apt install mariadb-server -y
systemctl status mariadb
mysql_secure_installation
Install PHPMyAdmin

Install PHPMyAdmin 5.0.2 as shown below by extracting it to the /usr/share/phpmyadmin directory.

To install the latest version of phpMyAdmin visit the phpMyAdmin page

wget -c https://files.phpmyadmin.net/phpMyAdmin/5.0.2/phpMyAdmin-5.0.2-english.tar.gz
tar xzvf phpMyAdmin-5.0.2-english.tar.gz
sudo mv phpMyAdmin-5.0.2-english /usr/share/phpmyadmin
ln -s /usr/share/phpmyadmin /var/www/html
Code language: JavaScript (javascript)
Configure NGINX

Open the NGINX configuration file by entering the following command.

nano /etc/nginx/sites-available/default
Code language: JavaScript (javascript)

Add the following lines of code to the server block

index index.php index.html index.htm;

location ~ \.php$ {
  try_files $fastcgi_script_name =404;
  include fastcgi_params;
  fastcgi_pass  unix:/run/php/php7.4-fpm.sock;
  fastcgi_index index.php;
  fastcgi_param DOCUMENT_ROOT  $realpath_root;
  fastcgi_param SCRIPT_FILENAME   $realpath_root$fastcgi_script_name; 
}

Code language: PHP (php)

Test the configuration and restart the server.

nginx -t
systemctl restart nginx
systemctl status nginx

Hoorey! Now it’s time to test PHPMyAdmin by typing following URL.

http://IP_SERVER/phpmyadmin
Code language: JavaScript (javascript)

If you encounter an error The $cfg'TempDir' is not accessible... on PHPMyAdmin.

Create a tmp Directory in PHPMyAdmin

mkdir /usr/share/phpmyadmin/tmp

And then add permission to that created directory

chmod 755 -R /usr/share/phpmyadmin/tmp

If you are see an error β€œThe secret passphrase in configuration (blowfish_secret) is too short.”

config.inc.php

If your PHPMyAdmin directory doesn’t contain any config.inc.php file then copy config.sample.inc.php and create config.inc.php as shown below.

mv /usr/share/phpmyadmin/config.sample.inc.php /usr/share/phpmyadmin/config.inc.php

Open the PHP Config file by entering the following command

sudo nano /usr/share/phpmyadmin/config.inc.php

Enter blowfish secret code with 32 characters random phrase.

$cfg['blowfish_secret'] = '32_char_random_phrase_here';
// KLS$vbc91Lkja$vc@opGbxA278EWopdc
Code language: PHP (php)
Watch the whole tutorial from the video below,

If you like the article please share with others and drop your ideas and suggestions at the comment section.

Categories
Programming

Top 5 Programming languages to learn in 2020

Programming is one of the most important skill to be mastered in today’s world. If you are new to the field of software engineering, the very first question comes to your mind is β€œWhat’s the best Programming Language to Master ?” that’s an important question to decide your programming career. There are many popular programming languages to learn in 2020. Let’s find out the best 5 programming languages to master.

Disclaimer :

The information provided in this article is my own personal opinion and it’s no mean of degrading any programming languages available today. Feel free to share your opinion in the comment section.

#1 Python

Python

Python is a high-level, general-purpose programming language which has been emerging in 2020 as one of the most frequently used language in the area of data science, Artificial Intelligence and Machine Learning. Created by Guido van Rossum. Python has been a growing programming language ever since the release. Python is largely used in web applications, desktop apps, network servers, machine learning and more. Python is considered to be the fastest language and it’s very easy to learn and it has fewer syntactical constructions than other languages.

Learn Python via Learn to CODE

Data scientists and people from Computer Science have involved in scripting based open-source language. to use it for their ML algorithms, techniques, and Jobs in Data Science.

Python is comparatively easy to learn and code with minimal syntax. It provides a huge array of in-built libraries and frameworks for Data Science which consist of Bokeh, Pandas, Numpy, Scipy, Matplotlib, StatsModel with extension framework for Deep learning include

  • Theano.
  • Lasagne.
  • Blocks.
  • TensorFlow.
  • Keras.
  • MXNet.
  • PyTorch.

Here is an example for a simple Python β€œHello World!” program:

 print ("Hello World!")
Code language: PHP (php)
Learning CurveEasy to Learn
Job opportunityHigher

#2 JS

JS

JavaScript is used as the β€œfrontend” programming language in web apps. It’s most commonly used as a client-side scripting language. If you have mastered any other programming languages before, then learning JavaScript will be much easier for you.

Why JavaScript is Used?

JavaScript is commonly known for its usability for the front-end of the web. Although JS is used for many other areas. Along with the front-end of the web, It’s been widely used for the following areas.

JS powered Mobile Applications

Most of the Mobile Applications are developed using Native Languages which are provided by their OS (Operating System). Although Cross-Platform Development is widely used to get rid of the pain of coding more than once. The mobile JS frameworks like React Native and PhoneGap are created to facilitate Android and iOS development with one single code base. This helps the developers to use JS to build mobile applications easily.

Web Applications

JS is not only limited to front-end development for the interactive web. But the development of new frameworks and libraries are allowing users to develop a lot of back-end programs with JS. which includes interactive web apps and server apps. JS is widely used in previous years and it continues to grow because of its flexibility and speed. These are few of the JavaScript frameworks popularly used by developers today.

Games

Most of the developers are very familiar with JS than other languages. Due to this, It’s possible to develop games via JS. When it comes to the modern browsers They have the capability of rendering WebGL, they can render complex 3D and 2D graphics without the need for third-party applications. These are some of the JS engines to build games.

Here is an example of a simple JavaScript β€œHello World!” program:

<script>
document.getElementById("demo").innerHTML = "Hello JavaScript!";
</script>
Code language: HTML, XML (xml)
Learning CurveIf you are fluent in any other languages. then it’s easy to learn.
Job opportunityHigh

#3 Java

Java is a general-purpose, high-level programming language. It’s intended to let application developers β€œwrite once, run anywhere” (WORA), meaning that compiled Java code can run on all platforms. Java was originally developed by James Gosling at Sun Microsystems (which has since been acquired by Oracle Corporation) and released in 1995.

Java is also widely used in Mobile Application Development, Web Application Development and Creating Desktop Applications.

  1. Desktop Base Applications :Desktop Applications can be created using libraries like Java Swing or JavaFX. They provide components to create text boxes, graphics and buttons for the GUI.
  2. Web Base Applications : Java provides support for web application through Servlets and JSPs.
  3. Mobile Base Applications : Native Android Applications are written in Java. Furthermore, Android Studio provides development tools for developing in Java.

Here is an example of a simple Java β€œHello World!” program:

 class Hello {
 public static void main(String args[]){
     System.out.println("Hello World");
 }
}
Code language: JavaScript (javascript)
Learning CurveIf you are good at OOP. then, It would be easy to learn.
Job opportunityHigher

#4 Kotlin

Kotlin

Kotlin is founded by JetBrains and it has been open source since 2012. It’s an Open Source, General Purpose statically typed pragmatic programming language for the Android and Java Virtual Machine. You can find the Open Source Kotlin Project on GitHub. Kotlin is becoming one of the trending languages in 2020.

Google Announced the support for Kotlin in Android Studio IDE three years back at I/O 2017. Which led the long-time preferred language Java for Android to switch into Kotlin.

The Syntax of Kotlin is minimal, clean and modern. It’s very easy to learn Kotlin because of it’s minimal and easy to understand nature. It’s similar to Apple’s Swift Language.

Here is an example of a simple Kotlin β€œHello World!” program:

println("Hello World!")
Code language: JavaScript (javascript)

The support of Kotlin Multiplatform aims to extend the compatibility to other platforms and it incorporates the developers to reuse the code and their expertise by reducing the tasks to implement twice or thrice.

With the swift growth of its presence among the developers, Kotlin is already in a phase of adapting to Data Science. Some of the following tools and libraries are now supporting data science as listed below.

  • Apache Spark & Apache Zeppelin: Kotlin is used in Spark Java API from both Jupyter and Zeppelin.
  • Jupyter: Now you can use Kotlin kernel for Jupyter notebooks by accessing third-party data science frameworks written in Java and Kotlin.

Learn the basics of Kotlin with Learn to CODE

Learning CurveRelatively easy to learn when comparing to other languages. The syntax is similar to JAVA.
Job opportunityHigh

#5 Swift

Swift is a high-level, Open Source, General-Purpose, Compiled programming language created for iOS Development, OS X, watchOS by Apple. Swift language is based on Objective-C, which was used for NeXTSTEP development. It’s an alternative to the Objective-C language which was the most popular language for building apps for Apple Platform.

Swift is easy to use and with syntactic simplicity to match Python. Which can be used to build apps much faster with less learning curve.

Here is an example of a simple Swift β€œHello World!” program:

import Swift
print("Hello, World!")
Code language: JavaScript (javascript)
Learning CurveSoft Learning Curve.
Job opportunityHigh

That ends the list of top five programming languages in 2020. If you like the article please share with others and drop your ideas and suggestions in the comment section.

Categories
PHP

PHP Array Functions and their usage with examples

This tutorial is created to give an abstract idea about commonly used PHP array function with examples. Through this tutorial you’ll be able to know, how to use array functions to make code more short and simple.

Note:

I’ll be only covering some of the basicΒ array functions, Which were frequently used by PHP developers. You can refer all the array functions from the officialΒ PHP Documentation. Feel free to share your opinion in the comment section.

Creating an Array in PHP

PHP array is created using an array() function. There are basically three types of arrays in PHP

  1. Indexed arrays – An array with a numeric index.
  2. Associative arrays – An array with named keys.
  3. Multidimensional arrays – An array containing one or more arrays.

To create an indexed array, add array values inside the parentheses, separated by commas.

$randomNames = array("Peace","Love","BH","Bishrul","Haq");
Code language: PHP (php)

OR

$randomNames = array();

$randomNames[0] = "Peace";
$randomNames[1] = "Love";
$randomNames[2] = "BH";
$randomNames[3] = "Bishrul";
$randomNames[4] = "Haq";
Code language: PHP (php)

Let’s look into some of the PHP functions in detail.

  1. List()

List function is used to Assign variables as if they were an array. It helps to insert without assigning values to each array index.

$names = array("Dev","BH","Peace");

// without list function()
$one = $names[0];
$two = $names[1];
$three = $names[2];


// with list function()
list($one,$two,$three) = $names;

echo 'one   : '. $one.' two   : '. $two.' three : '. $three;
Code language: PHP (php)

Output

Array ( [0] => BH [1] => is [2] => Carm )
Code language: PHP (php)
  1. preg_slit() or explode()

These two functions are used to split a string by a given string. Which helps to skip string, if you don’t need them to be shown.

$words = 'BH|is|Carm';
$array = explode('|', $words);

// exploded words are displayed in the array
print_r($array);
Code language: PHP (php)

Output

one : Dev two : BH three : Peace
  1. extract()

extract() function is used to export an associative array to variables. For every array element, a variable will be created with the name of a key and value as a value of the element.

$details = [
    'name' => 'bishrul',
    'age'    => '24',
    'color'   => 'fair',
];

extract($details);

echo("$name $age $color");
Code language: PHP (php)

Output

bishrul 24 fair
  1. compact()

It’s the exact opposite of explode() function, Which convert the given variables into an associative array.

$name  = 'bishrul';
$age   = '24';
$color = 'fair';

$array = compact('name', 'age', 'color');

print_r($array);
Code language: PHP (php)

Output

Array ( [name] => bishrul [age] => 24 [color] => fair )
Code language: PHP (php)
  1. array_combine()

Which creates an array by using one array for array keys and another for its array values.

$keys = ['name', 'age', 'color'];
$values = ['bishrul', '24', 'fair'];

$details = array_combine($keys, $values);
print_r($details);
Code language: PHP (php)

Output

Array ( [name] => bishrul [age] => 24 [color] => fair )
Code language: PHP (php)
  1. array_merge()

To merge two or more arrays into one array array_merge() is used. values of arrays will be merged together, and values with the same keys will be overwritten with the last array.

$array1 = ['one' => '1', 'two' => '2', 'three' => '3'];
$array2 = ['one' => '11', 'four' => '4', 'three' => '33'];

$merge = array_merge($array1, $array2);
print_r($merge);
Code language: PHP (php)

Output

Array ( [one] => 11 [two] => 2 [three] => 33 [four] => 4 )
Code language: PHP (php)
  1. array_sum() & array_product()

array_sum() is used to get the sum of given array values and array_product() to multiply the given array values.

$values = [4, 4, 3, 1, 5];

echo('Sum :'.array_sum($values).' Product :'. array_product($values)); 
Code language: PHP (php)

Output

Sum :17 Product :240
Code language: CSS (css)

If you like the article please share with others and drop your ideas and suggestions at the comment section.

Categories
PHP

PHP Program to remove empty or specific array elements.

This tutorial is created to remove specific or empty (NULL) array elements from the array.

  1. array_filter() to Remove Empty Elements

array_filter() function removes false values when declared using a callback function, however, If the callback function returns true, the current value from input is returned into the result array.

  1. $array (mandatory): This is where the input array is given.
  2. $callback_function (optional): The user-defined function is given . If the function is not given then all entries of the array equal to FALSE and will be removed.
  3. $flag (optional): The arguments passed to the callback function is defined.
    • ARRAY_FILTER_USE_KEY β€“ Only key argument is passed to the callback function, instead of the value of the array.
    • ARRAY_FILTER_USE_BOTH β€“ Both value and key as arguments to callback instead of the value.

Syntax :

array array_filter($array, $callback_function, $flag)
Code language: PHP (php)

Below is a program showing how to return filtered array elements using array_filter() function.

<?php
// Declaring the array
$array = array("bishrul", 27, '', null, "developer", 45,"for", 1994, false,);

// Function to remove empty elements
$filtered_array = array_filter($array);

// Display the array
var_dump($filtered_array);
Code language: HTML, XML (xml)

Output :

array(6) { [0]=> string(7) "bishrul" [1]=> int(27) [4]=> string(9) "developer" [5]=> int(45) [6]=> string(3) "for" [7]=> int(1994) }
Code language: PHP (php)
  1. unset() Function to Remove Empty Elements.

The Another way is to remove empty elements from array is using empty() function along with the unset() function. The empty() function is used to check whether the element is empty is not.

<?php
// Declaring the array
$array = array("bishrul", 27, '', null, "developer", 45,"for", 1994, false,);

// Loop to find empty elements
foreach($array as $key => $value)
  if(empty($value)){
  unset($array[$key]);
}

// Displaying the array
foreach($array as $key => $value)
    echo ($array[$key] . " , ");
?> 
Code language: HTML, XML (xml)

Output :

bishrul , 27 , developer , 45 , for , 1994 ,

Removing a specific value using unset() function in PHP.

<?php
// Declaring the array
$array = array("bishrul", 27, '', null, "developer", 45,"for", 1994, false,);

// Loop to find empty elements
foreach($array as $key => $value)
  if($value == "bishrul"){
  unset($array[$key]);
}

// Displaying the array
foreach($array as $key => $value)
    echo ($array[$key] . " , ");
?> 
Code language: HTML, XML (xml)

Output :

27 , , , developer , 45 , for , 1994 , ,

Hope this tutorial helped you! Feel free to drop your opinion at the comment section.

Categories
Laravel

Connecting Multiple Databases in Laravel 5.8

This tutorial is created to implement multiple database connections using mysql. Let’s see how to configure multiple database connections in Laravel 5.8.

# Laravel 5.8

Laravel 5.8 continues the improvements made in the previous release (version 5.7). ReferΒ release notesΒ to see the changes made in Laravel 5.8.

  1. Install Laravel 5.8

First, let’s install Laravel 5.8 using the following command (Make sure to have composer installed in your PC) to Install Composer.

composer create-project --prefer-dist laravel/laravel multiDatabase
  1. Configure Database Details

You need to configure the databases at MYSQL and then we need to connect that database to the Laravel project (You can also use phpmyadmin to create the database). Open the .env file inside Laravel project and add the database credentials as below.

.env

DB_CONNECTION=mysql
DB_HOST='Your DB Host'
DB_PORT='Your DB Port'
DB_DATABASE='Your DB Name'
DB_USERNAME='Your DB UserName'
DB_PASSWORD='Your DB Password'

DB_CONNECTION_2=mysql
DB_HOST_2='Your DB Host'
DB_PORT_2='Your DB Port'
DB_DATABASE_2='Your DB Name'
DB_USERNAME_2='Your DB UserName'
DB_PASSWORD_2='Your DB Password'
Code language: JavaScript (javascript)

In this step, Update β€œconfig/database.php” with following code to create database connections.

config/database.php

'default' => 'mysql',
'connections' => [

    'mysql' => [
        'driver' => env('DB_CONNECTION'),
        'host' => env('DB_HOST'),
        'port' => env('DB_PORT'),
        'database' => env('DB_DATABASE'),
        'username' => env('DB_USERNAME'),
        'password' => env('DB_PASSWORD'),
       ....
    ],

    'mysql2' => [
        'driver' => env('DB_CONNECTION_2'),
        'host' => env('DB_HOST_2'),
        'port' => env('DB_PORT_2'),
        'database' => env('DB_DATABASE_2'),
        'username' => env('DB_USERNAME_2'),
        'password' => env('DB_PASSWORD_2'),
       ....
    ]
]
Code language: PHP (php)
  1. Create the migration file.

Go to the terminal and type the following php artisan command to generate the model and migration file.

php artisan make:migration create_multi_data_table
Code language: CSS (css)

The migration will be created under “database/migrations”. Edit the file with the code below to Create Multi Data Table.

create_multi_data_table.php

<?php
use Illuminate\Support\Facades\Schema;
use Illuminate\Database\Schema\Blueprint;
use Illuminate\Database\Migrations\Migration;

class CreateMultiDataTable extends Migration
{
    /**
     * Run the migrations.
     *
     * @return void
     */
    public function up()
    {
        Schema::connection('mysql2')->create('multiData', function (Blueprint $table) {
            $table->increments('id');
            $table->string('name');
            $table->text('detail');
            $table->timestamps();
        });
    }

/**
 * Reverse the migrations.
 *
 * @return void
 */
public function down()
{
   Schema::connection('mysql2')->dropIfExists('multiData');
}
}
Code language: HTML, XML (xml)

Type the following command to run the migration.

php artisan migrate --database=mysql2
  1. Create Controller and model

If you encounter any errors, Clear the cache by running the following command.

php artisan config:cache
Code language: CSS (css)

Create the multiData model using the following command.

php artisan make:model multiData
Code language: CSS (css)

The model wil be generated in “app/multiData.php” Now, we will write the schema inside multiData.php file. Specify the β€œ$connection” variable as shown below.

multiData.php

<?php
namespace App;

use Illuminate\Database\Eloquent\Model;

class multiData extends Model
{
     protected $connection = 'mysql2';
}
Code language: HTML, XML (xml)

Create the MultiDataController by typing the following command.

php artisan make:controller MultiDataController
Code language: CSS (css)

app/Http/Controllers/MultiDataController.php

<?php
namespace App\Http\Controllers;

use App\Student;
use Illuminate\Http\Request;

class MultiDataController extends Controller
{

    public function yourMethod()
    {
        $multiData = new multiData;
        $multiData->setConnection('mysql2');
        $multi = $multiData->find(1);
        return $multi;
    }


}
Code language: HTML, XML (xml)

You can also define custom connection with query builder as shown below

DB::connection('mysql2')->select(...)->(...);
Code language: PHP (php)

Hope this tutorial helped you! Feel free to drop your opinion at the comment section.

Categories
PHP

Simple PHP MySQL CRUD Application

PHP is widely used by many developers today and it’s one of the easiest language to learn. This tutorial will help you to learn the basic CRUD (Create, Read, Update, Delete) operations in PHP using MYSQL.

PHP CRUD
  1. Create the DB(Database) file

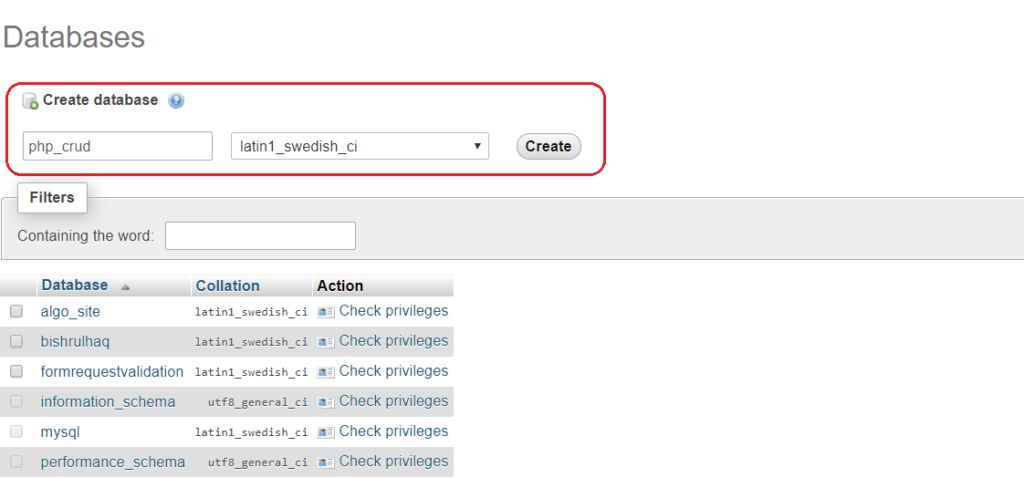
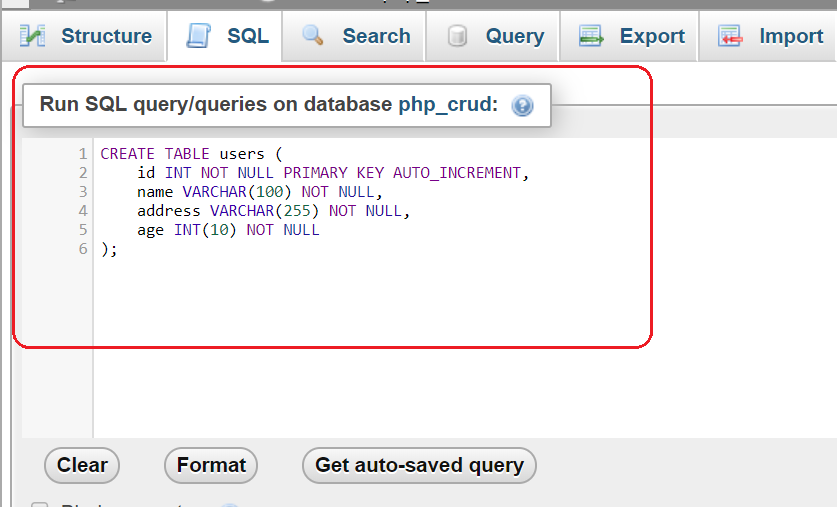
Create the DB as ‘php_crud’ and run the following SQL query to create table users inside the MySQL ‘php_crud’ database.

Creating the DB
Creating the DB

SQL query to create a table named users

Table in PHP CRUD
Creating the Table
CREATE TABLE users (
    id INT NOT NULL PRIMARY KEY AUTO_INCREMENT,
    name VARCHAR(100) NOT NULL,
    address VARCHAR(255) NOT NULL,
    age INT(10) NOT NULL
);
Code language: PHP (php)

Now, It’s time to create the DB config.php file as shown below

config.php

<?php
define('DB_SERVER', 'localhost');
define('DB_USERNAME', '');
define('DB_PASSWORD', '');
define('DB_NAME', 'php_crud');

$link = new mysqli(DB_SERVER, DB_USERNAME, DB_PASSWORD, DB_NAME);

if ($link->connect_errno) {
    printf("Connect failed: %s\n", $link->connect_error);
    exit();
}
Code language: HTML, XML (xml)
  1. Creating the Pages

Create the landing page for the CRUD application that contains a table to show the records from the users table.

index.php

<?php
require_once "config.php";
$sql = "SELECT * FROM users";
$result = $link->query($sql);
?>
<!DOCTYPE html>
<html lang="en">
<head>
    <meta charset="UTF-8">
    <title>PHP CRUD : bishrulhaq.com</title>
    <link rel="stylesheet" href="https://maxcdn.bootstrapcdn.com/bootstrap/4.0.0/css/bootstrap.min.css"
          integrity="sha384-Gn5384xqQ1aoWXA+058RXPxPg6fy4IWvTNh0E263XmFcJlSAwiGgFAW/dAiS6JXm" crossorigin="anonymous">
    <style>
        .btn{
            margin-left: 10px;
        }
    </style>
</head>
<body>
<div class="wrapper">
    <div class="container">
        <div class="row">
            <div class="col-md-12">
                <div class="card" style="margin-top: 20px;margin-bottom: 20px;">
                    <div class="card-body">
                        <h2 class="pull-left">User Details <a href="create.php" class="btn btn-success pull-right">Add New User</a></h2>
                        <h6>Find more interesting tutorials at <a href="https://bishrulhaq.com/">bishrulhaq.com</a></h6>
                    </div>
                </div>
                <?php
                if ($result->num_rows > 0) {
                        echo "<table class='table table-bordered table-striped'>";
                        echo "<thead>";
                        echo "<tr>";
                        echo "<th>#</th>";
                        echo "<th>Name</th>";
                        echo "<th>Address</th>";
                        echo "<th>Age</th>";
                        echo "<th>Action</th>";
                        echo "</tr>";
                        echo "</thead>";
                        echo "<tbody>";
                        while ($row = $result->fetch_assoc()) {
                            echo "<tr>";
                            echo "<td>" . $row['id'] . "</td>";
                            echo "<td>" . $row['name'] . "</td>";
                            echo "<td>" . $row['address'] . "</td>";
                            echo "<td>" . $row['age'] . "</td>";
                            echo "<td>";
                            echo "<a href='read.php?id=" . $row['id'] . "' class='btn btn-primary'>Read</a>";
                            echo "<a href='update.php?id=" . $row['id'] . "' class='btn btn-info'>Update</a>";
                            echo "<a href='delete.php?id=" . $row['id'] . "' class='btn btn-danger'>Delete</a>";
                            echo "</td>";
                            echo "</tr>";
                        }
                        echo "</tbody>";
                        echo "</table>";
                        // Free result set
                        $result->free();
                    } else {
                        echo "<p class='lead'><em>No records were found.</em></p>";
                    }
                $link->close();
                ?>
            </div>
        </div>
    </div>
</div>
</body>
</html>
Code language: HTML, XML (xml)

In this step, Let’s create the “create.php” and add the following code inside it.

create.php

<?php
require_once "config.php";

if ($_SERVER["REQUEST_METHOD"] == "POST") {

    if (isset($_POST['name']) && isset($_POST['address']) && isset($_POST['age'])) {

        $sql = "INSERT INTO users (name, address, age) VALUES (?,?,?)";
        if ($stmt = $link->prepare($sql)) {
            $stmt->bind_param("ssi", $_POST['name'], $_POST['address'], $_POST['age']);
            if ($stmt->execute()) {
                header("location: index.php");
                exit();
            } else {
                echo "Error! Please try again later.";
            }
            $stmt->close();
        }
    }

    $link->close();
}
?>

<!DOCTYPE html>
<html lang="en">
<head>
    <meta charset="UTF-8">
    <title>Create User : bishrulhaq.com</title>
    <link rel="stylesheet" href="https://maxcdn.bootstrapcdn.com/bootstrap/4.0.0/css/bootstrap.min.css"
          integrity="sha384-Gn5384xqQ1aoWXA+058RXPxPg6fy4IWvTNh0E263XmFcJlSAwiGgFAW/dAiS6JXm" crossorigin="anonymous">
</head>
<body>
<div class="wrapper">
    <div class="container">
        <div class="row">
            <div class="col-md-12">
                <div class="page-header">
                    <h2>Create Users</h2>
                </div>
                <p>Fill this form to add users to the database.</p>
                <form action="<?php echo $_SERVER["PHP_SELF"] ?>" method="post">
                    <div class="form-group">
                        <label>Name</label>
                        <input type="text" name="name" class="form-control" required>
                    </div>
                    <div class="form-group">
                        <label>Address</label>
                        <textarea name="address" class="form-control" required></textarea>
                    </div>
                    <div class="form-group">
                        <label>Age</label>
                        <input type="number" name="age" class="form-control" required>
                    </div>
                    <input type="submit" class="btn btn-primary" value="Submit">
                    <a href="index.php" class="btn btn-default">Cancel</a>
                </form>
            </div>
        </div>
    </div>
</div>
</body>
</html>
Code language: HTML, XML (xml)

Create “delete.php” and add the following code inside it. Which will help to delete a particular user by passing the ID.

delete.php

<?php
if (isset($_GET["id"]) && !empty($_GET["id"])) {

    require_once "config.php";
    $sql = "DELETE FROM users WHERE id = ?";

    if ($stmt = $link->prepare($sql)) {
        $stmt->bind_param("i", $_GET["id"]);
        if ($stmt->execute()) {
            header("location: index.php");
            exit();
        } else {
            echo "Error! Please try again later.";
        }
    }
    $stmt->close();
    $link->close();
} else {
    echo "Error! Please try again later.";
}
?>
Code language: HTML, XML (xml)

Now, Let’s Create the “read.php” and add the following code inside it.

read.php

<?php
require_once "config.php";

if (isset($_GET["id"]) && !empty(trim($_GET["id"]))) {
    $sql = "SELECT * FROM users WHERE id = ?";
    if ($stmt = $link->prepare($sql)) {
        $stmt->bind_param("i", $_GET["id"]);
        if ($stmt->execute()) {
            $result = $stmt->get_result();
            if ($result->num_rows == 1) {
                $row = $result->fetch_array(MYSQLI_ASSOC);

                $name = $row["name"];
                $address = $row["address"];
                $age = $row["age"];

            } else {
                echo "Error! Please try again later.";
                exit();
            }

        } else {
            echo "Error! Please try again later.";
            exit();
        }
    }
    $stmt->close();
    $link->close();
} else {
    echo "Error! Please try again later.";
    exit();
}
?>
<!DOCTYPE html>
<html lang="en">
<head>
    <meta charset="UTF-8">
    <title>View User : bishrulhaq.com</title>
    <link rel="stylesheet" href="https://maxcdn.bootstrapcdn.com/bootstrap/4.0.0/css/bootstrap.min.css"
          integrity="sha384-Gn5384xqQ1aoWXA+058RXPxPg6fy4IWvTNh0E263XmFcJlSAwiGgFAW/dAiS6JXm" crossorigin="anonymous">
    <style>
        label{
            font-weight: bold;
        }
    </style>
</head>
<body>
<div class="wrapper">
    <div class="container">
        <div class="row">
            <div class="col-md-12">
                <div class="card" style="margin-top: 20px;">
                    <div class="card-body">
                        <div class="page-header">
                            <h1>View User</h1>
                        </div>
                        <div class="form-group">
                            <label >Name</label>
                            <p class="form-control-static"><?php echo $name; ?></p>
                        </div>
                        <div class="form-group">
                            <label>Address</label>
                            <p class="form-control-static"><?php echo $address; ?></p>
                        </div>
                        <div class="form-group">
                            <label>Age</label>
                            <p class="form-control-static"><?php echo $age; ?></p>
                        </div>
                        <p><a href="index.php" class="btn btn-primary">Back</a></p>
                    </div>
                </div>
            </div>
        </div>
    </div>
</div>
</body>
</html>
Code language: HTML, XML (xml)

Create “update.php” and add the following code inside it. Which will help to update the particular user data

update.php

<?php
require_once "config.php";

if (isset($_GET['id'])) {
    $sql = "SELECT * FROM users WHERE id = ?";
    if ($stmt = $link->prepare($sql)) {
        $stmt->bind_param("i", $_GET["id"]);
        if ($stmt->execute()) {
            $result = $stmt->get_result();
            if ($result->num_rows == 1) {
                $row = $result->fetch_array(MYSQLI_ASSOC);

                $param_name = $row["name"];
                $param_address = $row["address"];
                $param_age = $row["age"];
            } else {
                echo "Error! Data Not Found";
                exit();
            }
        } else {
            echo "Error! Please try again later.";
            exit();
        }
        $stmt->close();
    }
} else {
    header("location: index.php");
    exit();
}

if ($_SERVER["REQUEST_METHOD"] == "POST") {
    if (!empty($_POST["name"]) && !empty($_POST["address"]) && !empty($_POST["age"])) {

        $sql = "UPDATE users SET name = ?, address = ?, age = ? WHERE id = ?";
        if ($stmt = $link->prepare($sql)) {

            $stmt->bind_param("ssii", $_POST["name"], $_POST["address"], $_POST["age"], $_GET["id"]);
            $stmt->execute();
            if ($stmt->error) {
                echo "Error!" . $stmt->error;
                exit();
            } else {
                header("location: index.php");
                exit();
            }
            $stmt->close();
        }
    }
    $link->close();
}

?>

<!DOCTYPE html>
<html lang="en">
<head>
    <meta charset="UTF-8">
    <title>Update User : bishrulhaq.com</title>
    <link rel="stylesheet" href="https://maxcdn.bootstrapcdn.com/bootstrap/4.0.0/css/bootstrap.min.css"
          integrity="sha384-Gn5384xqQ1aoWXA+058RXPxPg6fy4IWvTNh0E263XmFcJlSAwiGgFAW/dAiS6JXm" crossorigin="anonymous">
    <style>
        label{
            font-weight: bold;
        }
    </style>
</head>
<body>
<div class="wrapper">
    <div class="container">
        <div class="row">
            <div class="col-md-12">
               <div class="card" style="margin-top:20px;">
                   <div class="card-body">
                       <div class="page-header">
                           <h2>Update User</h2>
                       </div>
                       <p>Edit the input to update the User.</p>
                       <form action="<?php echo $_SERVER['REQUEST_URI']; ?>" method="post">
                           <div class="form-group">
                               <label>Name</label>
                               <input type="text" name="name" class="form-control" required value="<?php echo $param_name; ?>">
                           </div>
                           <div class="form-group">
                               <label>Address</label>
                               <textarea name="address" class="form-control" required ><?php echo $param_address; ?></textarea>
                           </div>
                           <div class="form-group">
                               <label>Age</label>
                               <input type="text" name="age" class="form-control" value="<?php echo $param_age; ?>" required>
                           </div>
                           <input type="submit" class="btn btn-primary" value="Submit">
                           <a href="index.php" class="btn btn-default">Cancel</a>
                       </form>
                   </div>
               </div>
            </div>
        </div>
    </div>
</div>
</body>
</html>
Code language: HTML, XML (xml)

Hope this tutorial helped you! Feel free to drop your opinion in the comment section.

Categories
Laravel

Clearing Route, View, Config Cache in Laravel 5.8

Sometimes you may face an issue that the changes to the Laravel Project may not update on the web. This occures when the application is served by the cache. In this tutorial, You’ll learn to Clear ApplicationRouteConfigBrowser Cache in Laravel Project.

Go to your Laravel Project and open the Terminal. Here you can type the commands to clear cache as show below :

  1. Clear Route Cache

Type the following command to clear route cache of the Laravel application.

php artisan route:cache
Code language: CSS (css)
  1. Optimize Laravel Cache

Note : The Artisan optimize command is deprecated as of 5.5. With recent improvements to PHP itself including the OPcache, the optimize command no longer provides any benefit.

php artisan optimize
  1. Clear Application Cache

Type the following command to clear application cache of the Laravel application.

php artisan cache:clear
Code language: CSS (css)
  1. Clear Configuration Cache

Type the following command to clear configuration cache of the Laravel application.

php artisan config:cache
Code language: CSS (css)
  1. Clear View Cache

Type the following command to clear view cache of the Laravel application.

php artisan view:clear
Code language: CSS (css)
  1. Clear Browser Cache

You can clear the cache by defining the command inside the router.Then access this URL in the browser to clear the cache of Laravel project.

Route::get('/clear-cache', function() {
    Artisan::call('cache:clear');
    return "Cache is cleared";
});
Code language: PHP (php)

Hope this tutorial helped you! Feel free to drop your opinion at the comment section.

Categories
Laravel

Integrating Google ReCaptcha in Laravel 5.8

reCAPTCHA is a free service from Google. It’s a CAPTCHA-like system designed to recognize that the user is human and, at the same time, assist in the digitization of books. It helps to protects your website from spam and abuse.

Note :

If you’re running the Laravel Project at your Local Server. It’s also acceptable for testing Google reCAPTCHA.

In this tutorial, You’ll learn to integrate Google reCAPTCHA in your Laravel Project. Follow the step by step guide to create the application.

Google Recaptcha
Google Recaptcha
  1. Create reCAPTCHA for your Domain

First, You need to create reCAPTCHA for your domain by logging into Google reCAPTCHA Admin Console.

  1. Set the Keys in .env file

After creating the account, Obtain the Key and Secret. Add them to the .env file as shown below,

.env

RECAPTCHA_KEY='your recaptcha key'
RECAPTCHA_SECRET='your recaptcha secret'
Code language: JavaScript (javascript)

You can name the key and secret as you like. I have named them as RECAPTCHA_KEY, RECAPTCHA_SECRET .It is required later in the validation form.

  1. Create the Form Request Validaiton

Create the Custom Validation Rules using form request validation in by typing the following command,

php artisan make:request ReCaptchaFormRequest
Code language: CSS (css)

The generated class will be stored in in the app/Http/Requests file directory. Open ReCaptchaFormRequest.php from the directory and add the validation rules inside the rules method

<?php
namespace App\Http\Requests;
use Illuminate\Foundation\Http\FormRequest;

class ReCaptchaFormRequest extends FormRequest
{
    public function authorize()
    {
        return true;
    }

    public function rules()
    {
        return [
            'g-recaptcha-response'=>'required|recaptcha'
        ];
    }
}
Code language: HTML, XML (xml)
  1. Create the Custom Validation with Guzzle

If you don’t have Guzzle, Install it by typing the command below at your terminal

composer require guzzlehttp/guzzle
Code language: JavaScript (javascript)

After installing Guzzle, Create a directory as Validation, Inside the Validation folder, Create a PHP file as ReCaptcha.php and add the code below,

app/Validation/ReCaptcha.php

<?php namespace App\Validation;

use GuzzleHttp\Client;

class ReCaptcha
{
    public function validate($attribute, $value, $parameters, $validator)
    {

        $client = new Client();

        $response = $client->post(
            'https://www.google.com/recaptcha/api/siteverify',
            ['form_params' =>
                [
                    'secret' => env('RECAPTCHA_SECRET'),
                    'response' => $value
                ]
            ]
        );

        $body = json_decode((string)$response->getBody());
        return $body->success;
    }

}
Code language: HTML, XML (xml)

The next step is to register Validation in AppServiceProvider’s Boot method.

public function boot()
{
   Validator::extend('recaptcha','App\\Validation\\ReCaptcha@validate');
}
Code language: CSS (css)
  1. Create the Captcha Controller

Type the following command at your terminal to create CaptchaController.php file in controllers

php artisan make:controller CaptchaController
Code language: CSS (css)

Create two methods as index and captcha in CaptchaController.

app/Http/Controllers/CaptchaController.php

<?php
namespace App\Http\Controllers;

use App\Http\Requests\ReCaptchaFormRequest;
use Illuminate\Http\Request;

class CaptchaController extends Controller
{
    public function index()
    {
        return view('index');
    }

    public function captcha(ReCaptchaFormRequest $reCaptchaFormRequest)
    {
        return "Done!";
    }
}
Code language: HTML, XML (xml)
  1. Create the Routes

In this step, Go to ‘routes->web.php’ file and add the following code.

Route::get('/','CaptchaController@index');
Route::post('/','CaptchaController@captcha');
Code language: PHP (php)
  1. Create the index.php View File

The final step is to create the index.php file in views directory

resources/views/index.blade.php

<!DOCTYPE html>
<html>
<head>
    <title>Laravel 5.8 GOOGLE RECAPTCHA - bishrulhaq.com</title>
    <link rel="stylesheet" href="https://maxcdn.bootstrapcdn.com/bootstrap/4.0.0/css/bootstrap.min.css" integrity="sha384-Gn5384xqQ1aoWXA+058RXPxPg6fy4IWvTNh0E263XmFcJlSAwiGgFAW/dAiS6JXm" crossorigin="anonymous">
    <script src='https://www.google.com/recaptcha/api.js'></script>
</head>
<body>

<div class="container">
    <div class="row" style="margin-top: 20px;">
        <div class="col-12 ">
            @if (count($errors) > 0)
                <div class="alert alert-danger">
                    <ul>
                        @foreach ($errors->all() as $error)
                            <li>{{ $error }}</li>
                        @endforeach
                    </ul>
                </div>
            @endif
        </div>
        <div class="col-12 ">
            <div class="card">
                <div class="card-body mx-auto">
                    <h3 class="text-center" style="font-weight: bold;padding-bottom: 10px;">GOOGLE ReCAPTCHA</h3>
                    <form class="form-horizontal" action="" method="post">
                        {!! csrf_field() !!}
                        <div class="form-group">
                            <div class="col-md-12">
                                <div class="g-recaptcha " data-sitekey="{{env('RECAPTCHA_KEY')}}"></div>
                            </div>
                        </div>
                        <div class="form-group">
                            <button type="submit" name="submit" class="btn btn-success">Submit</button>
                        </div>
                    </form>
                </div>
            </div>
        </div>
    </div>
</div>

</body>
</html>
Code language: HTML, XML (xml)

Type the following command in your terminal to run the project.

php artisan serve

Hope this tutorial helped you! Feel free to drop your opinion at the comment section.